
WordPress on an ARM VPS with Docker is a practical way to run a personal website on ARM64 hardware. This guide covers Docker Compose, WordPress, MySQL, private networking, a reverse proxy, DNS, HTTPS, and backups.
This WordPress on an ARM VPS with Docker setup uses safe placeholders rather than production values. Replace YOUR_DOMAIN, YOUR_DB_PASSWORD, and YOUR_PROXY_NETWORK with your own values. If you have questions, do not include real credentials in the comments; use placeholders instead.
WordPress on an ARM VPS with Docker: requirements
- An ARM64 VPS running a supported Linux distribution.
- A domain name and SSH access.
- Docker Engine and Docker Compose.
- A reverse proxy such as Nginx Proxy Manager connected to the application network.
- A separate location for tested backups.
Prepare the ARM VPS
Connect over SSH, apply security updates, and check the architecture:
uname -m
docker --version
docker compose version
An ARM64 server normally reports aarch64. Confirm that the selected images support ARM64. Do not expose a database port to the Internet.
Create a shared Docker network
If the reverse proxy and WordPress stack use separate Compose projects, create a shared external network:
docker network create YOUR_PROXY_NETWORKIf the network already exists, keep it. Do not remove it while other services depend on it.
Configure WordPress with Docker Compose
Create a new directory and save this as compose.yaml. WordPress and MySQL are not published on host ports; the reverse proxy reaches WordPress through Docker networking.
services:
  db:
    image: mysql:8.4
    restart: unless-stopped
    command: --default-authentication-plugin=mysql_native_password
    environment:
      MYSQL_DATABASE: YOUR_DB_NAME
      MYSQL_USER: YOUR_DB_USER
      MYSQL_PASSWORD: YOUR_DB_PASSWORD
      MYSQL_ROOT_PASSWORD: YOUR_DB_ROOT_PASSWORD
    volumes:
      - project_db_storage:/var/lib/mysql
    networks:
      - wordpress_private

  wordpress:
    image: wordpress:php8.3-apache
    restart: unless-stopped
    depends_on:
      - db
    environment:
      WORDPRESS_DB_HOST: db:3306
      WORDPRESS_DB_USER: YOUR_DB_USER
      WORDPRESS_DB_PASSWORD: YOUR_DB_PASSWORD
      WORDPRESS_DB_NAME: YOUR_DB_NAME
    volumes:
      - project_wordpress_storage:/var/www/html
    networks:
      - wordpress_private
      - proxy_network

volumes:
  project_db_storage:
  project_wordpress_storage:

networks:
  wordpress_private:
    internal: true
  proxy_network:
    external: true
    name: YOUR_PROXY_NETWORK
Important: project_db_storage and project_wordpress_storage are Docker volume labels, not passwords, usernames, or public ports. Knowing these labels alone does not provide access. You may rename them, but the names must match in the service and top-level volumes sections.
Protect the actual database values, especially MYSQL_PASSWORD, MYSQL_ROOT_PASSWORD, and the matching WordPress variables. Use long, unique secrets and store them securely.
Start and verify the containers
docker compose up -d
docker compose ps
docker compose logs --tail=100 wordpress
docker compose logs --tail=100 db
Wait for database initialization and confirm WordPress is attached to both the private and shared proxy networks.
Proxy manager interface
Create a proxy host with these placeholder values:
- Domain Names:
YOUR_DOMAIN - Scheme:
http - Forward Hostname / IP:
wordpress - Forward Port:
80 - Block Common Exploits: enabled
- Cache Assets: normally disabled unless tested
- Websockets Support: enable only when required
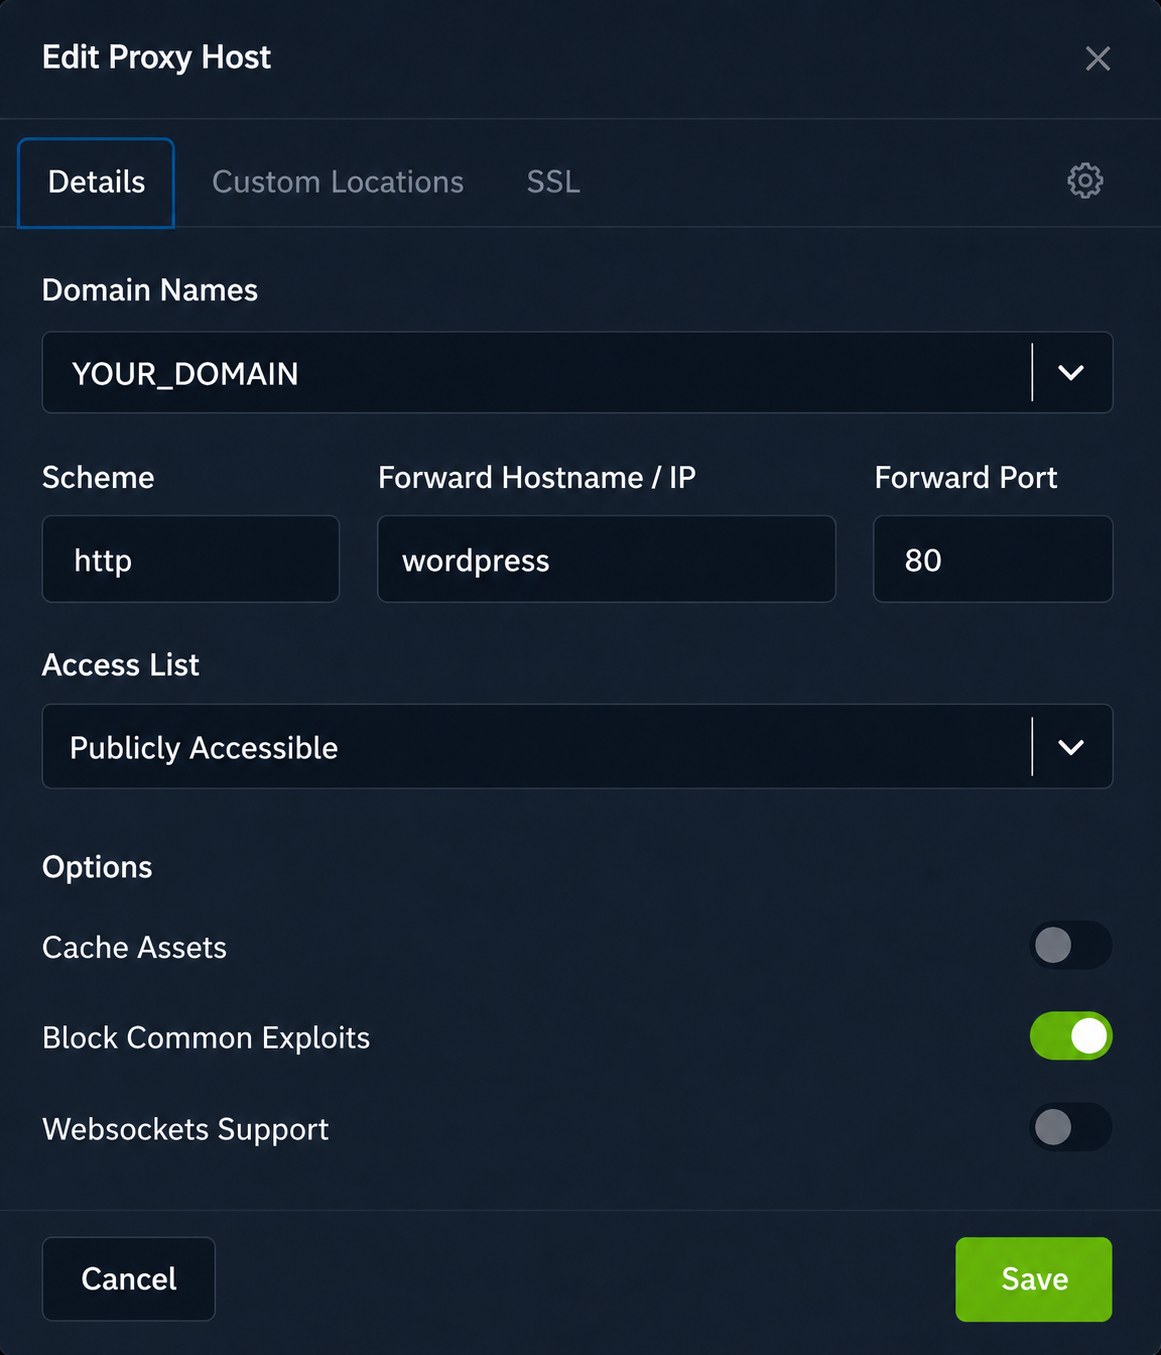
The upstream hostname is the Compose service name wordpress, not a server IP or arbitrary host port. The proxy must be connected to YOUR_PROXY_NETWORK.
File-based Nginx configuration
server {
    listen 80;
    server_name YOUR_DOMAIN;

    location / {
        proxy_pass http://wordpress:80;
        proxy_set_header Host $host;
        proxy_set_header X-Real-IP $remote_addr;
        proxy_set_header X-Forwarded-For $proxy_add_x_forwarded_for;
        proxy_set_header X-Forwarded-Proto $scheme;
    }
}
Configure DNS
In your DNS provider’s dashboard, add an A record: use @ for the root domain and set the value to your VPS public IPv4 address. Add an AAAA record only when IPv6 and the firewall are correctly configured.
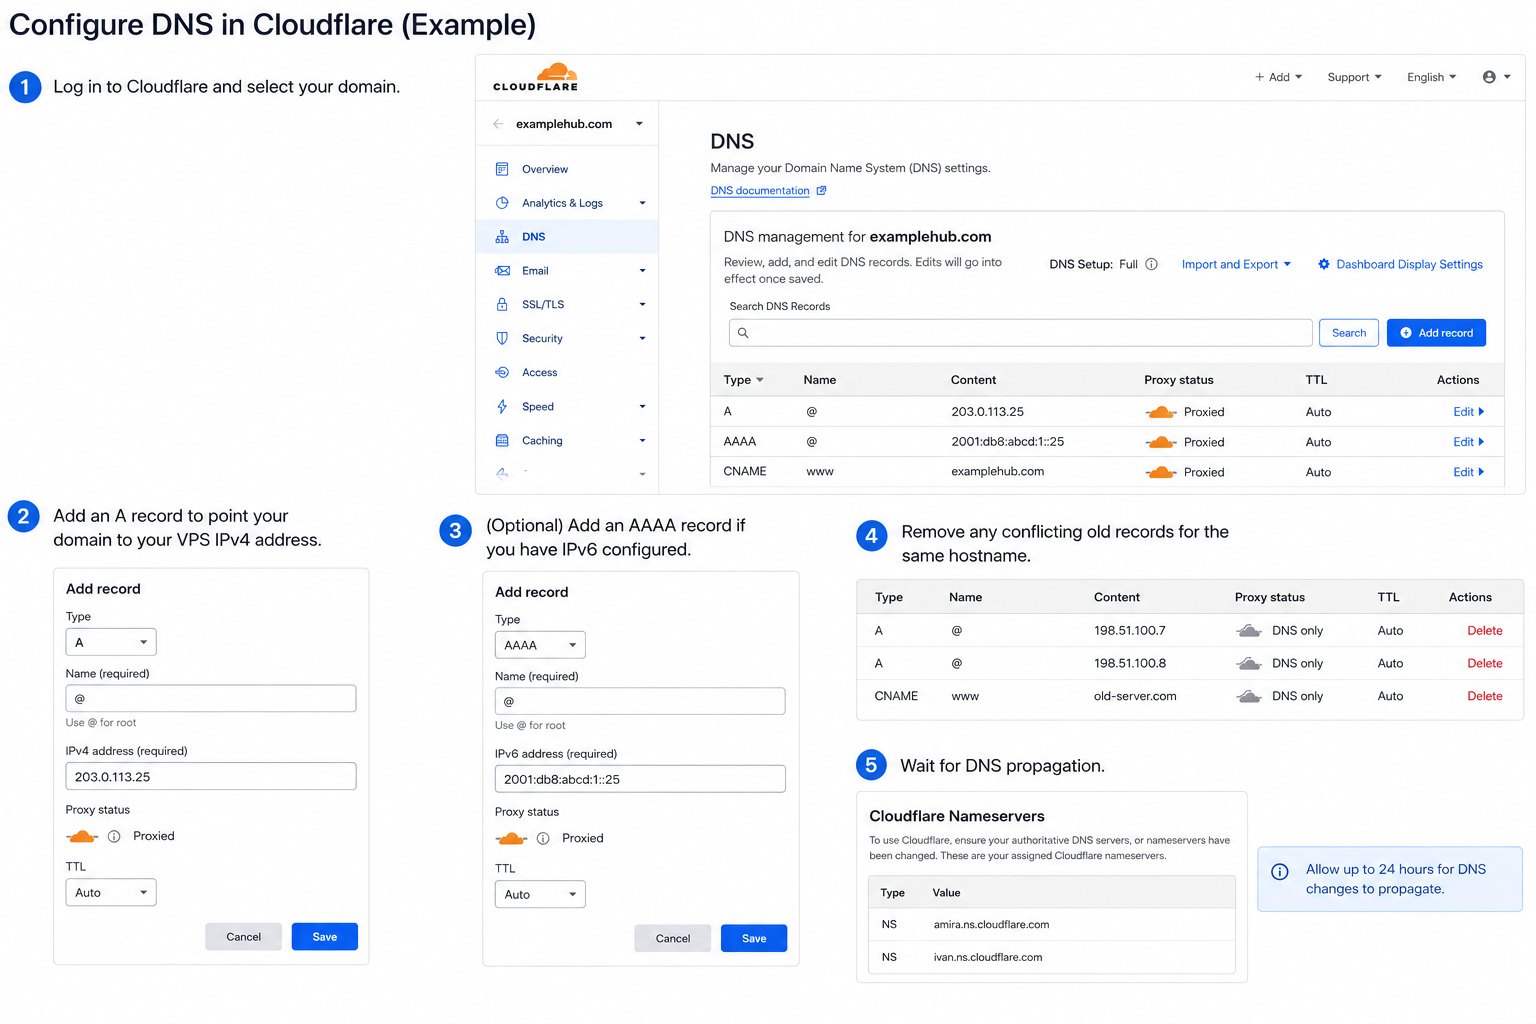
For www, you can use a CNAME pointing to YOUR_DOMAIN. Remove conflicting old records for the same hostname. Do not add a DNS record for the private Docker service name.
nslookup YOUR_DOMAINBefore requesting a certificate, confirm that the result points to the intended VPS and that public HTTP and HTTPS traffic reaches the reverse proxy.
Enable HTTPS
Open the proxy host’s SSL settings, select or request a certificate for YOUR_DOMAIN, and enable HTTPS redirection after the certificate is issued. Requests can fail when DNS is incorrect, ports 80 or 443 are blocked, or another service answers for the hostname.
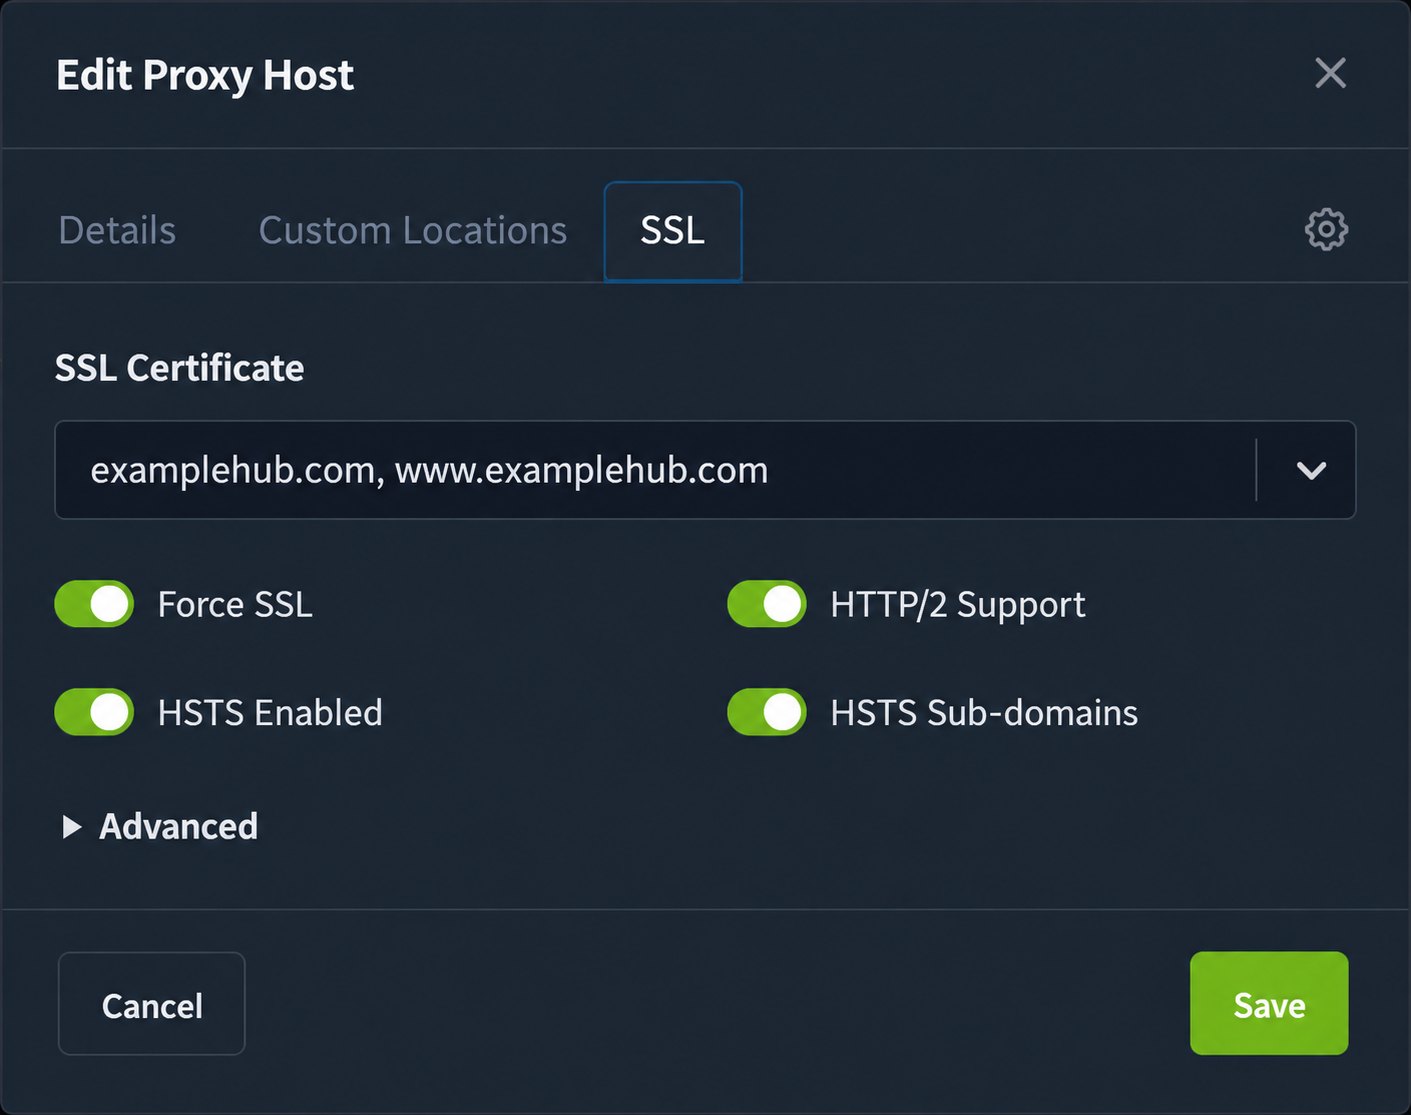
Enable Force SSL after HTTPS works correctly. Enable HSTS carefully because browsers remember HTTPS-only behavior. Enable HSTS subdomains only when every relevant subdomain supports HTTPS.
If WordPress reports mixed content or redirect loops, check the forwarded protocol headers and the WordPress site URL. Change one setting at a time and test in a private browser window.
Verify and back up
- Open
https://YOUR_DOMAINand confirm the certificate is valid. - Run
docker compose ps. - Confirm MySQL has no public host port.
- Check that the proxy resolves
wordpress. - Back up the WordPress volume and database to separate storage.
docker compose exec -T db mysqldump -uYOUR_DB_USER -pYOUR_DB_PASSWORD YOUR_DB_NAME > wordpress-backup.sqlAvoid placing real passwords in shell history. Test restoration before relying on a backup.
Common problems
502 Bad Gateway
Check shared network membership, the exact upstream name wordpress, and container port 80.
Certificate request fails
Check DNS, public reachability, firewall rules, and whether another service uses the public listeners.
Database connection errors
Check the service name, credentials, database name, and initialization logs. WORDPRESS_DB_HOST should use db:3306.
References
See the Guides category and Docker guides.